Circular Potholders

The past couple of days I’ve been working on making potholders. In the past I’ve made them by sewing 2 square dishcloths together or by using a double-thick pattern, like this one, which makes a gorgeous potholder but takes a long time and a lot of yarn.

I wanted something quick and easy, I also had a lot of cotton yarn in various lengths and colours so I wanted something that I could change colours easily when my scraps of yarn ran out.

Here’s what I came up with:

IMG_1450

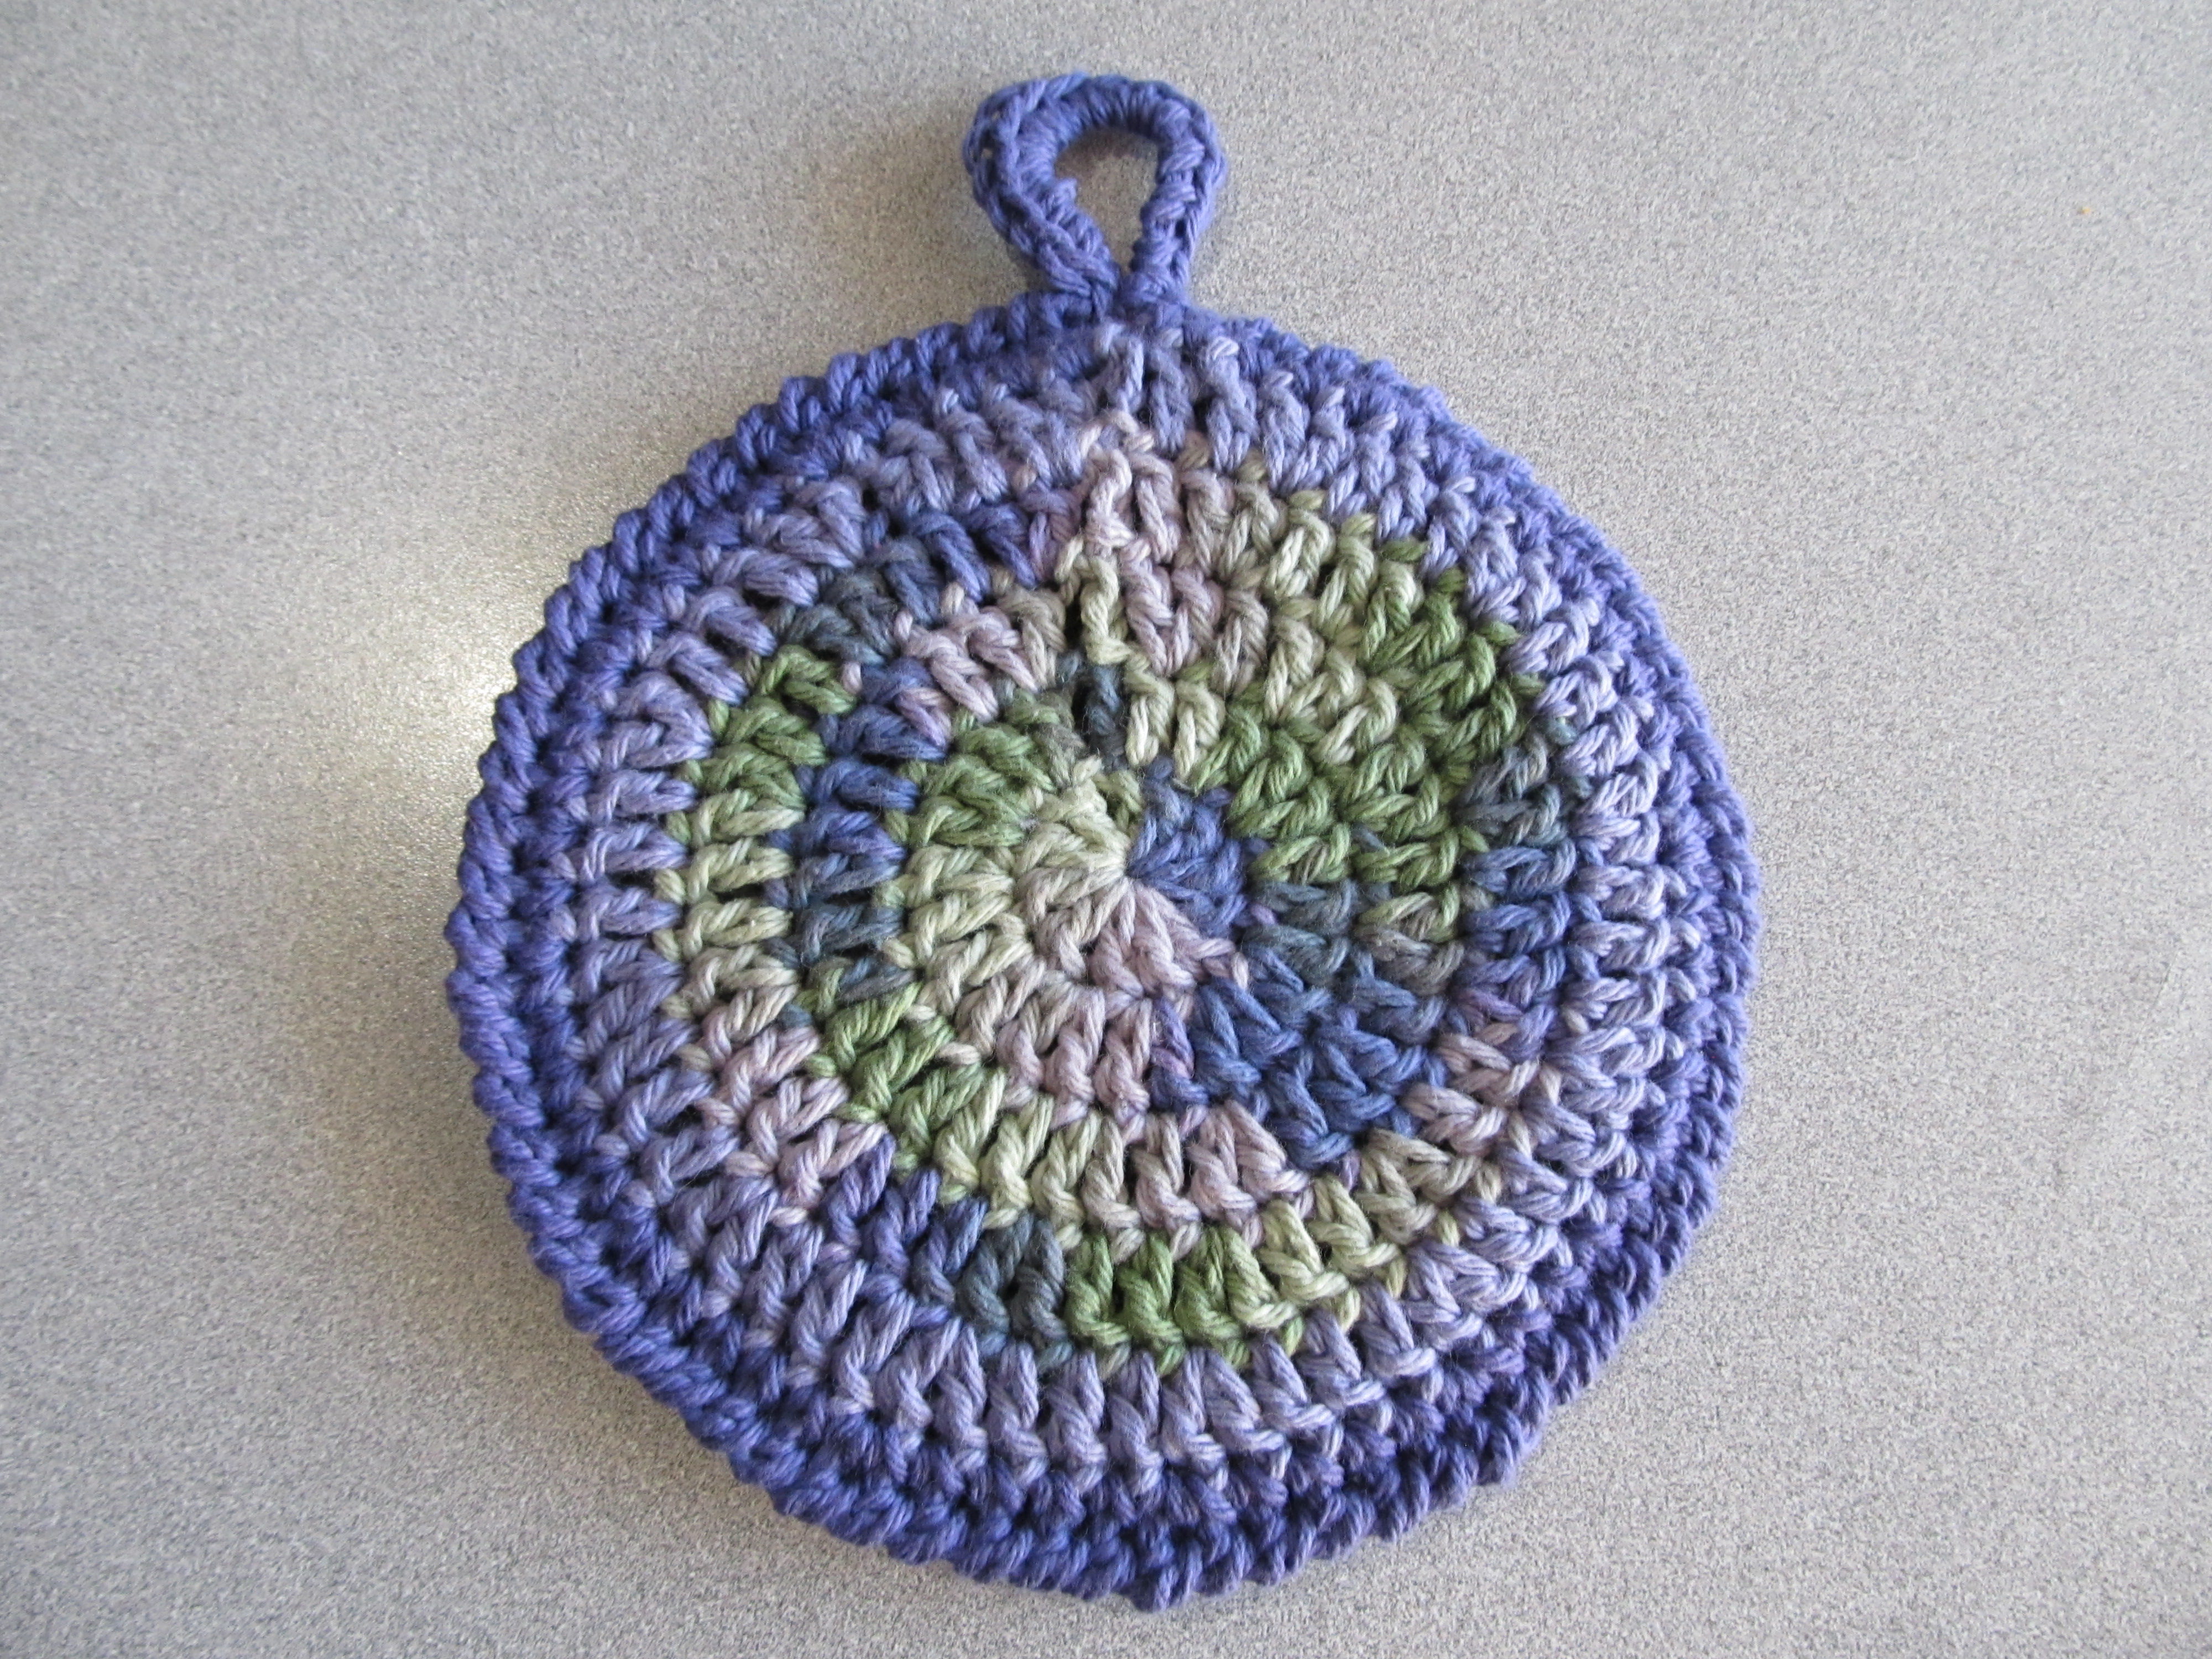
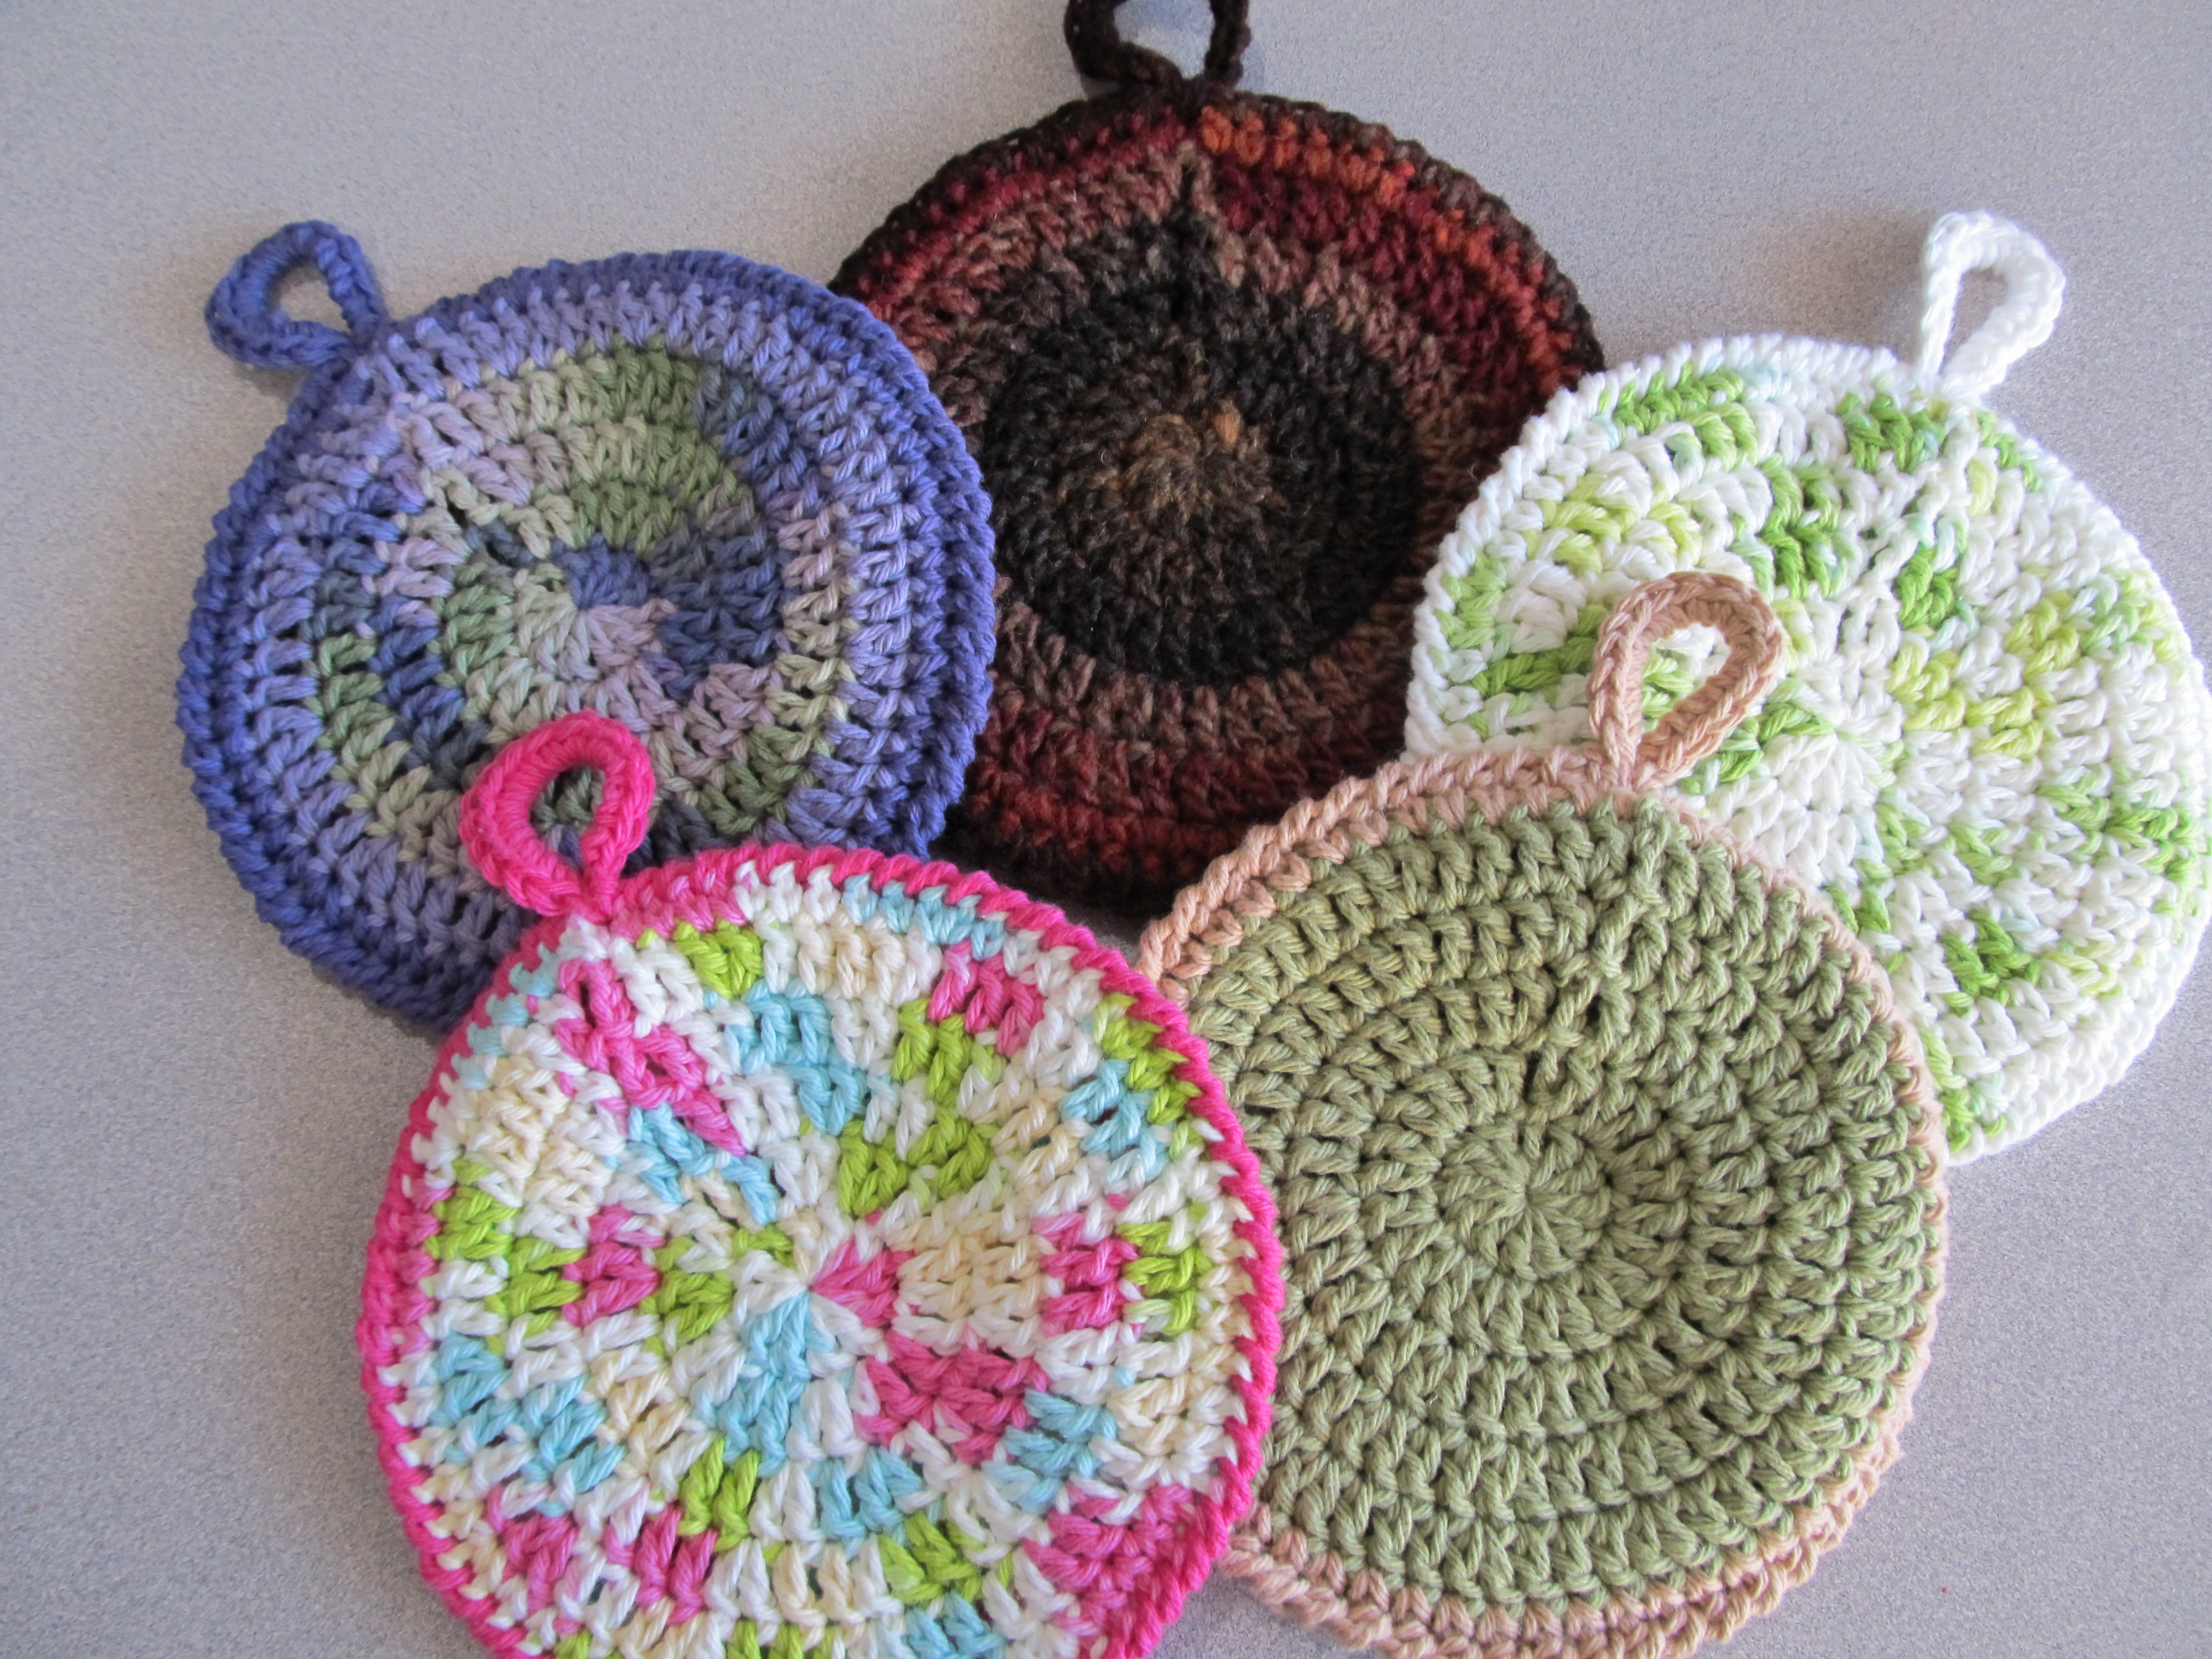
A circular potholder! These work up really quickly, they’ve been taking me under an hour from start to finish. I think they look nice with both variegated and solid colours. I made 4 out of cotton and 1 out of wool.

IMG_1453

Taa-daa!

Hooray for busting through my cotton stash! There’s still some left, but this definitely left a dent. I think I’m going to try making some felted ones with my wool stash.

I’m still a little undecided which one I like the most. I think the purple/green one is my favourite, but my partner likes the green/beige one.

Basically I made 2 circles using double crochet, then joined them together. It’s a pretty straight-forward pattern, but nonetheless I wrote it up to share.

Circular Potholder

*Note: Ch 3 at start of every round counts as a stitch

Materials:

-Worsted weight cotton or wool (I’ve read that acrylic will melt, but I’m not sure if it’s true)

-Size I/5.5 hook

** A note about gauge: **

If you’re finding that your circle is curving up into a bowl-shape, you need to go up a hook size. (Try size J/6.0)

If you’re finding that your circle is too slack and when you try to lay it flat there’s an extra bit of material that you can’t smooth down, you need to go down a hook size. (Try size H/5.0)

Pattern (make 2):

Round 1:  In a magic circle, ch 3 (counts as 1 DC), work 11 DC into ring, join. {12}

Round 2: Ch 3, work 2 DC into each st around (11 times). Work 1 DC into last st, join. {24}

Round 3: Ch 3, (work 2 DC into next st and 1 DC into next st), repeat around (10 more times). Work 2 DC into last st, join. {36}

Round 4: Ch 3, (work 2 DC into next st and 1 DC into each of the next 2 sts), repeat around (10 more times). Work 2 DC into next st and 1 DC into next st, join. {48}

Round 5: Ch 3, (work 2 DC into next st and 1 DC into each of the next 3 sts), repeat around (10 more times). Work 2 DC into next st and 1 DC into next 2 sts, join. {60}

For the next round I switched to single crochet

Round 6: Ch 1 (does not count as a st), (work 2 SC into next st and 1 SC into each of the next 4 sts), repeat around and join to first SC {72}

Fasten off, weave in ends.

Finishing:

– Holding the 2 ‘wrong sides’ together, join the 2 circles together.

Edging options:

– Single crochet around

-Slip stitch around

-Crab stitch/reverse single crochet (this is the one I used for the cotton potholders)

Edging with reverse single crochet

Edging with reverse single crochet

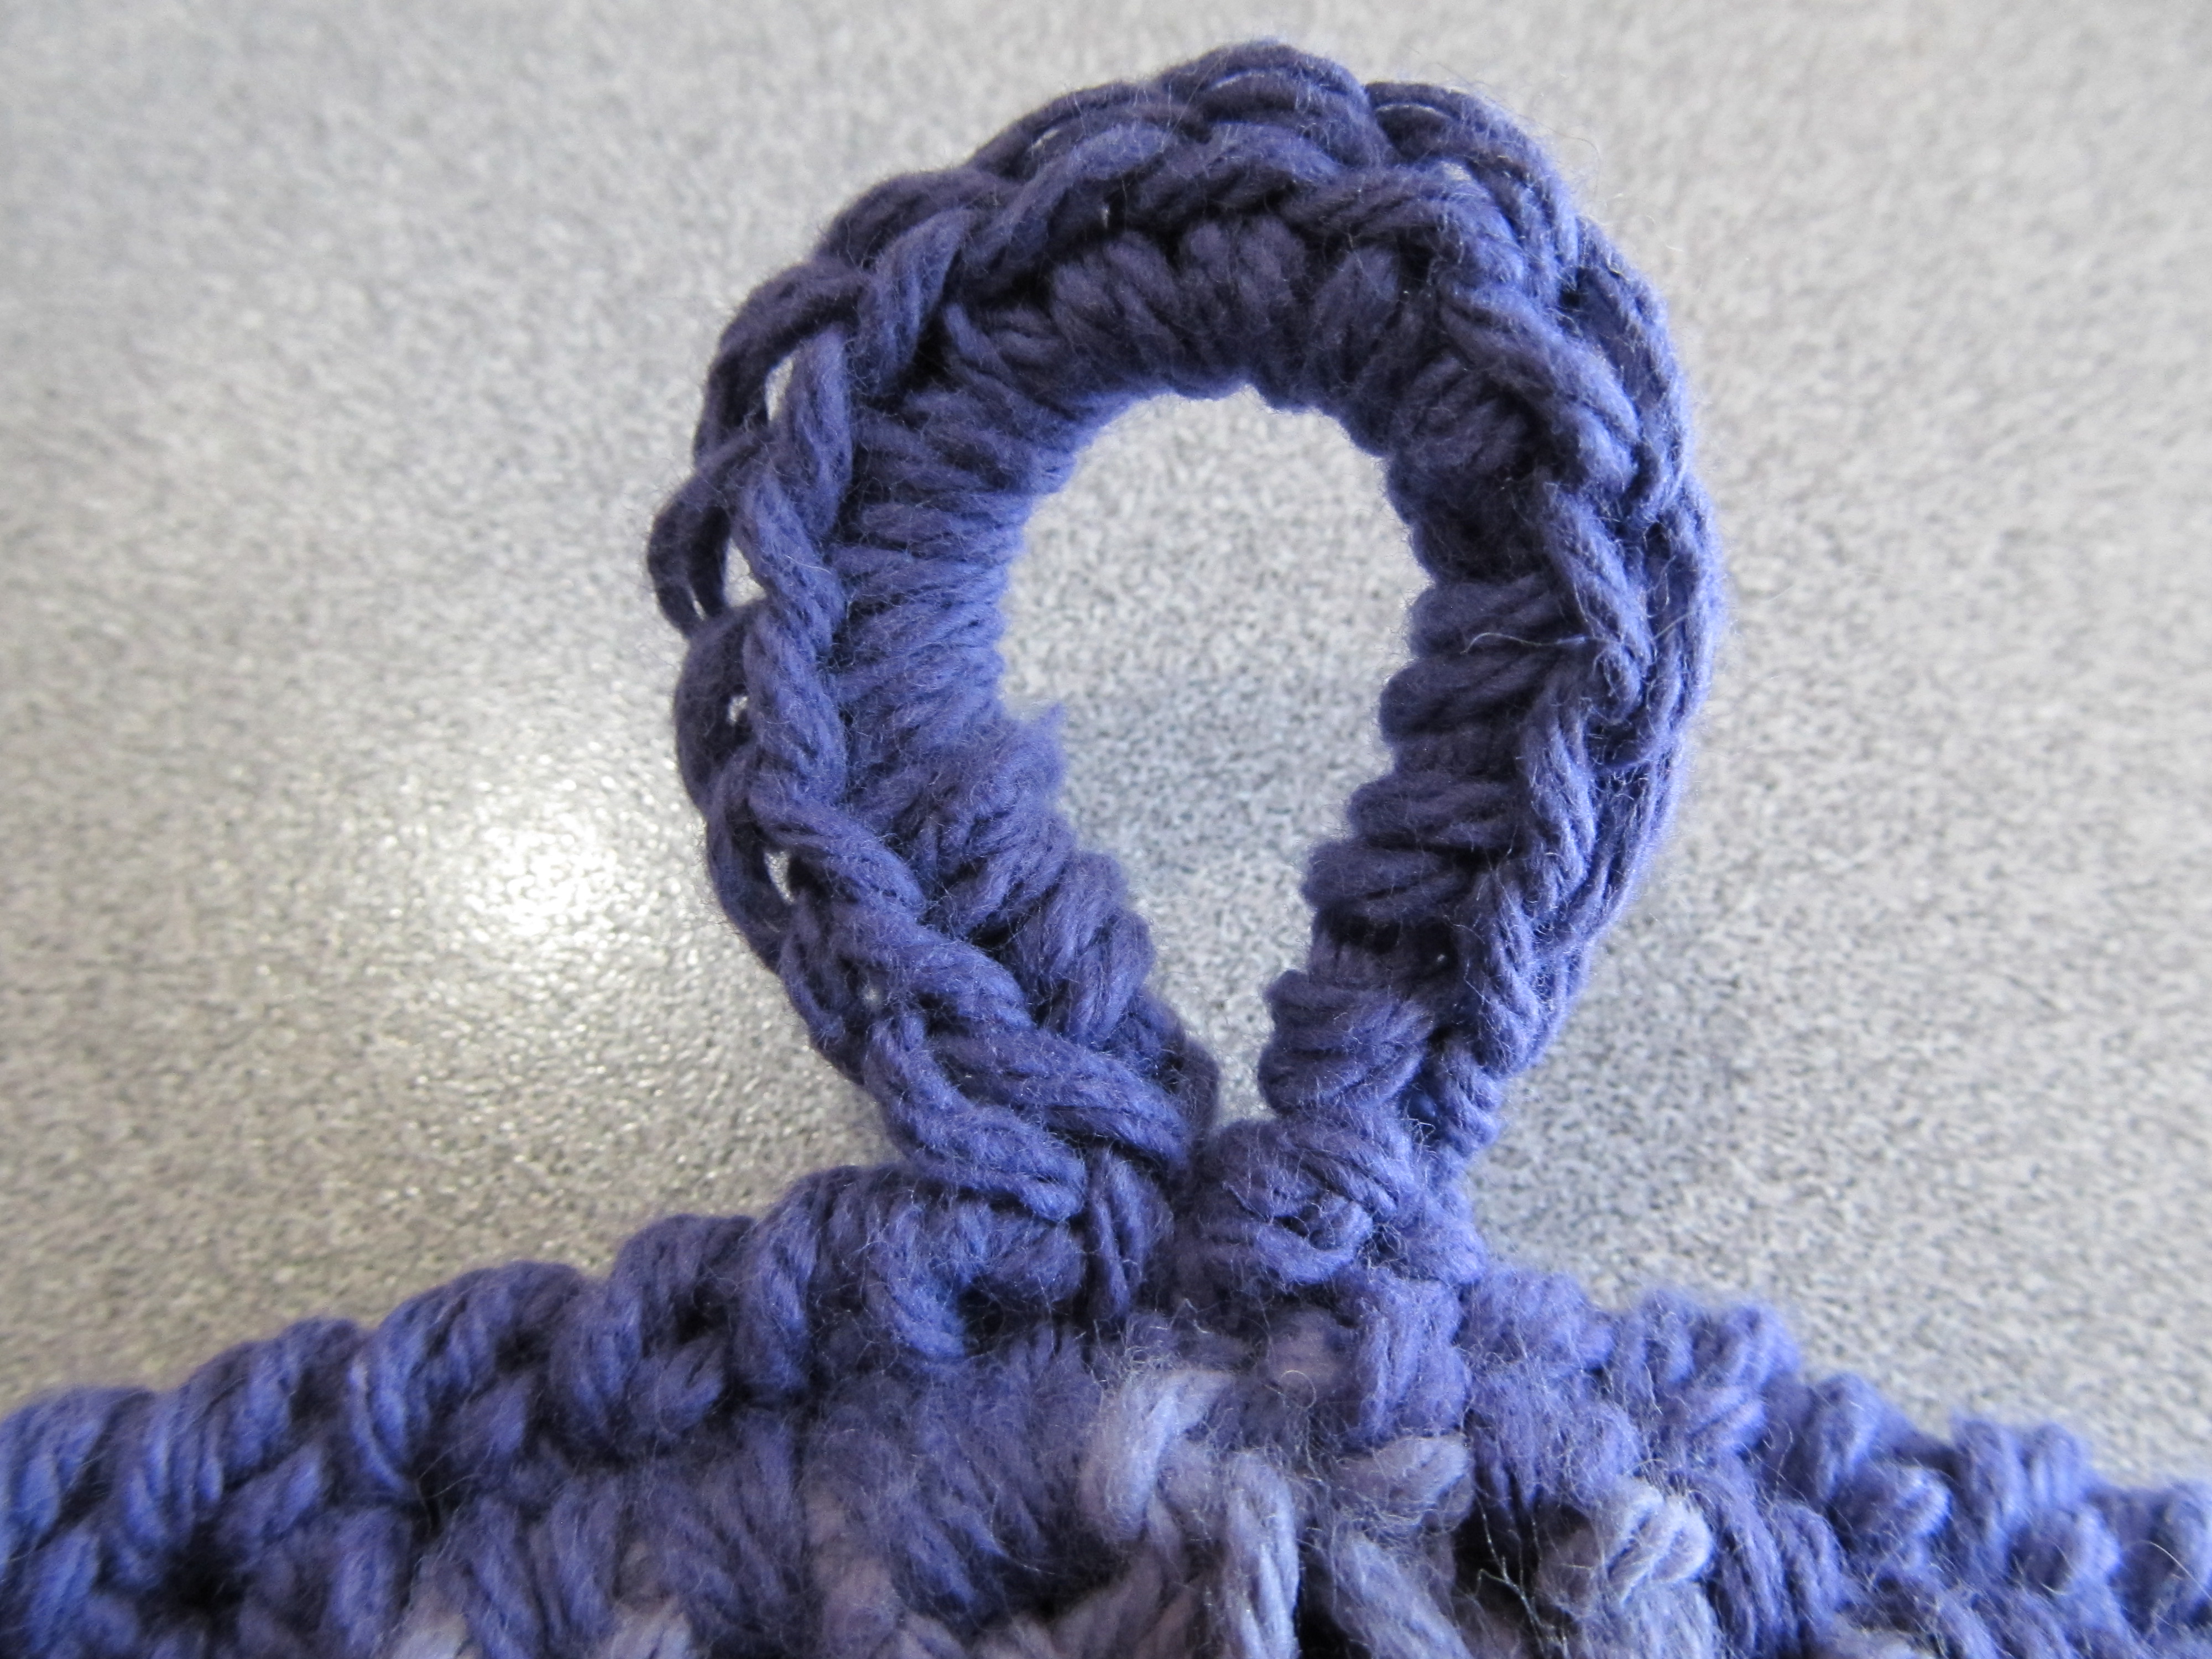
For the ring (optional):

– Ch 10, sl st into potholder, ch1 & turn

– Sc 15 evenly into ring created by chain (i.e. not into individual stitches, just into the ring)

IMG_1456

Purl Bee Cowl

I’ve been seeing a lot of cowl patterns lately and there seem to be two main methods: long & skinny (wrap around multiple times) or tall & short (go over your head once). I’ve been experimenting with both types and I’m still undecided about which one I prefer. Do you guys have a preference?

Over the Christmas break I made the two-color cowl from Purl Bee with some leftover light [3] weight yarn. Although  it turned out to be more yarn and time consuming than other cowls I’ve made, I’m very happy with how it turned out. I’d like to make some more, but I’ll probably use thicker yarn and a bigger hook next time so it doesn’t take so long.

Two Color Cowl

Cat Toys

I have two young and very rambunctious kitties. The one pictured above is Koshka, my sweetheart tabby (Koshka is the Russian word for ‘cat’ – I got her shortly after reading A Clockwork Orange, in which they use a lot of Russian words as slang). I love them both to pieces, but sometimes they drive me crazy trying to play with my yarn when I’m hooking. The solution? Crochet them some new cat toys!

These toys have to be some of the quickest projects I’ve whipped up. The first one I made was this ball. I also made the pill-shaped one for a friend of mine, but I only put a tail on one side. When I finished the ‘tailed pill’ toy I realized it looked inappropriate — I ended up not giving it to my friend.

Cat Ball

The second one I made was the ‘door hanger bouncy cat toy‘. If you make this, make sure it’s long enough that your cat can reach it. I followed the pattern and it ended up being too high to hang from a door knob.

Cat Toy

Ferret Coffee Cozies

I had a request to make ferret-style coffee cozies. Since I couldn’t find an existing pattern, I used my regular coffee cozy pattern and added some basic shapes. They came out looking a bit like mice, but that’s better than looking like bears (which is what the first attempts mostly resembled). After a lot of experimenting, this is how they turned out…

Image

Here’s the pattern in US terms:

Materials

Worsted weight cotton* yarn in 3 colours:

A: Main colour

B: White

C: Accent colour (darker than A)

*Note: I recommend using cotton because it won’t shrink or felt when washed, and it won’t melt when heated like acrylic does. You can also use wool but isn’t as easy to wash. The cozies that I’ve made with cotton yarn can go into the washing machine no problem. They’re also technically drier safe too but mine have faded when I’ve dried them so I’d recommend air-drying.

Crochet hooks F, G, H, & I

2 black buttons (for eyes) + 1 pink button (for the nose)

Very small amount of polyester fiberfill (for nose)

Pattern

Cup Cozy

Note: This pattern can be worked in continuous rounds OR with a slip stitch and chain 1 @ the end of each round. I prefer to slip stitch at the end of each row so the colours line up evenly.

With H hook & colour A, ch 25. Join with sl st (don’t twist chain)

With I hook:

Rd 1-3: Sc in each st around (25sts)

Rd 4: Sc in 1st st, [2sc in next, 1sc in each of next 11 sts] twice. (27sts)

Rd 5-6: Sc in each st around (27sts)

Rd 7: Sc in 1st st, [2sc in next, 1sc in each of next 12 sts] twice. (29sts)

Rd 8: Sc in each st around (29sts). Colour change to B (white yarn)

Rd 9: Sc in each st around (29sts)

Rd 10: Sc in 1st st, [2sc in next, 1sc in each of next 13 sts] twice. (31sts)

Rd 11-12: Sc in each st around (31sts)

Rd 13: Sc in 1st st, [2sc in next, 1sc in each of next 14 sts] twice. (33sts)

Rd 14: Sc in each st around (33sts). Finish off. Sew ends in.

Mask

To make the mask, you’re going to crochet an oval. Again, this can be worked in continuous rounds or can be joined at the end of each round. I prefer to join.

With F hook & yarn C (accent colour, Ch 7

Switch to G hook

Rd 1: Sc in 2nd st from hook and in next 4 sts. Sc 3 in the last st. Rotate your piece so you’re now working in the other side of the chain. Sc in the next 4 sts. Sc 2 in the last. Join to 1st sc (14 sts)

Rd 2: Ch 1, 2sc in 1st st, sc in next 4, 2sc in each of the next 3 (i.e. 6 sts), sc in next 4, 2sc in each of the next 2.  Join to the 1st sc. (16sts)

i.e. inc, 4 singles, [inc]x3, 4 singles, [inc]x2

Rd 3:  Ch 1, 2 sc in 1st st, sc in next 5, [2sc, 1sc] x3, sc in next 4, [2sc, 1sc] x2. Join to 1st sc. (22sts)

i.e. [inc, 1] 4 singles, [inc, 1] x3, 4 singles, [inc, 1] x2

Rd 4:  Ch 1, 2 sc in 1st st, sc in next 6, [2sc, 1sc in next 2] x3, sc in next 4, [2sc, 1sc in next 2] x2. Join to 1st sc. (28sts)

i.e. [inc, 1,1] 4 singles, [inc, 1,1] x3, 4 singles, [inc, 1,1] x2

Rd 5:  Ch 1, 2 sc in 1st st, sc in next 7, [2sc, 1sc in next 3] x3, sc in next 4, [2sc, 1sc in next 3] x2. Join to 1st sc. (34sts) Finish off leaving a tail for sewing.

i.e. [inc, 1,1,1] 4 singles, [inc, 1,1,1] x3, 4 singles, [inc, 1,1,1] x2

Nose

Work the nose in continuous rounds.

With I hook and yarn B (white)

Sc 4 into a magic circle

Rd 1: 2sc in each st (8sts)

Rd 2: Sc around (8sts)

Rd 3: [2sc, 1sc in next] around (12sts)

Rd 4: Sc around (12sts)

Rd 5: [2sc, 1 sc in next 2] around (16sts)

Rd 6: Sc around (16sts). Finish off leaving a tail for sewing.

With embroidery floss, sew pink nose onto the end. I used a small pink button for the nose, but you could easily embroider a little triangular nose on too.

You can also try adding a mouth 🙂

Ears (make 2)

With F hook and yarn B (white)

Row 1: Ch 2, 3 sc in 2nd ch from hook. Ch 1 & turn.

Row 2: 2sc in each st (6sts). Ch 1 & turn.

Row 3: [1sc, 2sc in next] across (9sts). Ch 1 & turn.

Row 4: [1sc in first 2 sts, 2sc in next] across (12 sts. Ch 1 & turn. Finish off leaving a tail for sewing.

Assembly

Image

First, sew mask onto cup cozy. Position it so the top of the oval lays across the 2nd to last row of the cozy.

Next, sew on the nose. It should lay almost entirely on top of the mask, but make sure there’s no mask peeking out through the bottom. When there is only a small opening left, add fiberfill and finish sewing to the cozy.

Now sew on the eyes and ears. The base of the ear should follow the curve of the mask without touching the mask.

Enjoy!

Image

Fingerless Gloves

It’s getting pretty chilly where I live, and I’ve been trying out different crocheted glove patterns. I really like this pattern by Crystal Palace Yarns! They’re really warm and comfortable. The only issue I have with them is that they can be difficult to get on and off, especially since single crochet doesn’t provide the most stretchy material.

Image

I made the blue gloves with Martha Stewart Merino in Igloo.

Image

I made the black and green gloves using Bernat Satin in Ebony and Lemon Grass.

Cute Coffee Cozies

I love making these coffee cozies! Whenever I buy coffee I always snag a cup sleeve to keep from burning my fingers… These work better than those cardboard disposable ones, and are much more environmentally friendly. They work up really quickly so I’ve made about a dozen to give to my friends. Enjoy!

IMG_0631

Materials

Worsted weight yarn – cotton works best (it’s easy to wash, and won’t melt like acrylic will when heated)

Note:  Even though these are washer- and dryer-safe, I’ve noticed that the colours fade when they’re put in the dryer, so it’s probably best to air-dry.

Size I (5.5mm) hook

Note: I crochet tight and had to use a larger hook size to fit a standard size coffee cup. The circumference of my first 3 rows measures about 8″

Pattern

Ch 24. Slip stitch to 1st ch, being careful not to twist chain. Working in continuous rounds:

Row 1-3: Sc around (24 sc)

Row 4: 2 Sc in first st, 1 sc in next 11 sts, 2 sc in next st, 1 sc in last 11 sts (26 sc)

Row 5-6: Sc around (26 sc)

Row 7: 2 Sc in first st, 1 sc in next 12 sts, 2 sc in next st, 1 sc in last 12 sts (28 sc)

Row 8-9: Sc around (28 sc)

Row 10: 2 Sc in first st, 1 sc in next 13 sts, 2 sc in next st, 1 sc in last 13 sts (30 sc)

Row 11-12: Sc around (30 sc)

Row 13: 2 Sc in first st, 1 sc in next 14 sts, 2 sc in next st, 1 sc in last 14 sts (32 sc)

Row 14: Sc around (32 sc)

Pattern Notes

These cozies look really good with multicoloured yarn. Or, try a striped effect by changing the colour every few rows, or 3 colours (A for row 1-6, B for 7-12, and C for 13 & 14). Decorate your cozy with buttons or crocheted flowers.

Here’s a standard 5-petal flower that I like to use:

Sc 5 into a magic ring. Sl st to first st.

*Ch 3, 3Dc into first st, ch 3, sl st into same st. Sl st into next st.

Repeat from * in each of the next 4 sts. Finish off.

Granite Stitch Men’s Scarf

I was looking for a crocheted scarf pattern that would be suitable for men. After several failed attempts with patterns that were too thick and chunky-looking, I came across the solution: use a larger hook and a looser stitch. I was inspired by Crochet in Color’s Ireland’s Scarf, but instead of working the scarf lengthwise, I went width-wise and added ch-1 spaces.

I have seen the “sc1, ch1, repeat” pattern called a granite stitch, but what is it called when the single crochet is replaced with an extended single crochet? I think it still looks pretty “granite-y”, but does anyone know what it’s proper name is?

This scarf would probably work well in women’s colours too, I just find it discouraging how few patterns there are for men’s crocheted items. In my experience, the colours you choose really determine the ‘gender’, and I’ve noticed that masculine scarves tend to be wider and have a stronger boarder.

** Note: I’ve made a step-by-step guide for this stitch and pattern, find it on my blog here **

Granite Scarf Pattern:

Materials

1 ball worsted weight yarn (make sure it’s soft against your skin. I used Bernat Satin in Forest Mist Heather)

Size J (6mm) hook

Finished Size

5″ x 66″ (I made mine 161 rows long)

Stitch Explanation

Esc (Extended Single Crochet):

  1. Insert hook into stitch, yarn over, pull through stitch (2 loops on hook)
  2. Yarn over, pull through first loop only (2 loops on hook)
  3. Yarn over, pull through both loops

Granite Stitch

Pattern

Foundation: Ch 26 (or any even number)

Row 1: 1 Sc in 2nd ch from hook and in each ch across (25 sc). Ch 1 and turn.

Row 2: 1 Esc in first st. *Ch 1. Miss next st. 1 Esc in next st. Repeat from * to end (13 Esc & 12 ch). Ch 1 and turn.

Row 3: 1 Esc in first st. 1 Esc in next ch-1 sp. *Ch 1. Miss next st. 1 Esc in next ch-1 sp. Rep from * to last st. 1 Esc in last sc. (14 Esc & 11 ch). Ch 1 and turn.

Row 4: 1 Esc in first st. *Ch 1. Miss next st. 1 Esc in next ch-1 sp. Repeat from * to last 2 st. Ch 1. Miss next st. 1 Esc in last st. (13 Esc & 12 ch). Ch 1 and turn.

Repeat last 2 rows until scarf is desired length. To finish, crochet 1 row of sc in each st and ch-1 sp across (25 sc). Ch 1 & turn. Sl st in each st across and finish off (25 sl st).

IMG_0639